2020年12月24日星期四

紫薯吐司(純素。無蛋奶)

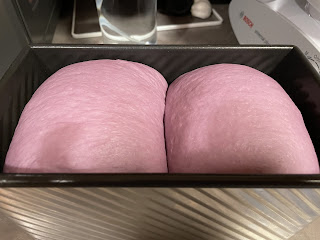
在美國,不是到處都可以買到天然色粉,早前特意從台灣訂購,終於可以嘗試如何用紫薯粉製作純素紫薯吐司了~!

由於大部份食譜都是使用新鮮紫薯泥、牛奶和雞蛋,為了製作純素、無蛋奶的版本,需要研究不同的食譜再加以改動。幸好,成功了,好開心啊!


材料:
紫薯粉 25克
高筋麵粉 270克
全麥低筋麵粉 30克
速發酵母 1小匙(約4克)
羅漢果糖(或其他砂糖)15克
鹽 1/4小匙
室溫水 200毫升
沙拉油/橄欖油 30克

事前準備:
- 所有材料秤好
- 預備450克(1斤)吐司模一個(如果不是不沾,請先用純素奶油塗抹內層防沾)
- 預備薄薄塗上一層沙拉油的保鮮盒或碗盆,供麵團發酵用

如何製作:
1. 按順序將材料放入攪拌機的碗盆,混合成為不黏手的麵團。
*各款麵粉的吸水量不同,可依麵團狀態增減液體。
2. 繼續攪打麵團,直至其逹到如耳垂般柔軟。如此時發現水份不足而不夠柔軟,可以每次5毫升的份量逐少添加液體。持續攪打直至麵團能夠撐得出薄膜(手套膜)。
3. 將麵團取出,滾圓並捏緊底部收口,放入已預先塗了沙拉油的保鮮盒/碗盆,表面上噴一些水,蓋上保鮮盒蓋/保鮮膜/矽膠蓋,放在密閉空間,作第一次發酵。
*發酵地點:有發酵功能的烤箱,大概28C(85F);微波爐及一杯熱水,熱水冷卻後立即更換,以維持溫暖的環境讓酵母活躍。
4. 將麵團取出,滾圓並捏緊底部收口,放入已預先塗了沙拉油的保鮮盒/碗盆,表面上噴一些水,蓋上保鮮盒蓋/保鮮膜/矽膠蓋,放在密閉空間,作第一次發酵,約60分鐘,至2倍大。


5. 首次發酵完成,工作枱上灑上手粉,麵團表面也灑上一些手粉,取出麵團放在工作枱上,輕輕拍打麵團排氣,然後將麵團分割成兩份(每份約290至300克)。
6. 將兩份麵團分別滾圓,蓋上擰乾的濕布,讓麵團休息15分鐘。
7. 休息過後,將麵團排氣及擀平為約25CM長方形,從短邊由遠至近朝著自己的方向捲起成長條狀,蓋上擰乾的濕布,讓麵團再休息15分鐘。
8. 將麵團擀平至約35CM長及與吐司模短邊同寬,翻面,從短邊由遠至近朝著自己的方向輕輕捲起,另一麵團同樣方式處理。
9. 將整形完成的麵團收口朝下放入吐司模,中間留一些空間,輕輕推壓兩個麵團使高度一致,再在表面噴上一些水,蓋上保鮮盒蓋/保鮮膜/矽膠蓋,放入密閉空間,作最後發酵,約60-70分鐘。


10. 當麵團發酵至8分滿時,預熱烤箱至200C(405F);當發酵至9分滿時,蓋上吐司模蓋。


11. 放入烤箱,烤38-40分鐘,立即從烤箱取出及輕敲模具脫模,放上網架放涼。
12. 用麵包刀切成喜愛的厚度,完成~

小分享:
- 液體份量請依麵粉的吸水程度及麵團狀態作調整 
- 烤箱溫度:上星期購入了TOSHIBA的多功能氣炸烤箱,由於發現210度會令吐司皮變得太乾,所以調整了溫度至200C(405F),如果是傳統烤箱,210C(410F)會更適合。 
兩次擀捲使吐司牽絲,口感更Q
- 液態油可以改成純素奶油,於麵團初步成團後分成小塊加入再揉搓至能夠撐出薄膜的麵團。
- 水可以改為植物奶

希望大家喜歡~也可以留言分享製作心得 =)


2020年12月9日星期三

Vegan Dark Brown Sugar Butter Rolls 純素黑糖牛油麵包捲

Finally, I have to admit that as a bread maniac, a stand mixer which can handle bread dough very well is indispensable. Therefore, I am sorry to my Kitchenaid Artisan and welcome the Bosch Universal Plus Mixer to my home.

The first bread I made with it is the Vegan Dark Brown Sugar Rolls. Bosch has done an amazing job and the rolls turned out to be tender and chewy. 


Ingredients:
- Unbleached bread flour 300g
- Instant dry yeast 1t
- Dark brown sugar 40g, predissolved in 1-1.5T warm water (or molasses)
- Sea salt 1/4t
- Water 200mL
- Vegan butter (salted OR unsalted), diced and melted 15g

Optional:
Maple syrup 1t + Water 1/2t, for glazing 

Steps - with Bosch Universal Plus Mixer:
1. Add all flour, dark brown sugar mixture, sea salt and 170mL water to the mixing bowl, set the mixer to Speed 1 and mix until a dough is formed. Slowly switch to Speed 2 to continue mixing, then gradually add the remaining 30mL water until a non-sticky dough is formed.
2. Stop the mixer. Add the melted butter to the dough, use Speed 1 to mix until it is absorbed to the dough throughly, and change to Speed 2, mix for an additional 6-8 minutes until the dough becomes smooth and elastic. 

3. Stop the mixer. Take a golf-size piece of the dough, gently stretch to see if a translucent "window pane" can be formed without tearing.
4. First proofing: Take out the dough, shape it into a ball and seal the dough by gently pinching the bottom. Place it in a lightly greased bowl, let it rise twice its size for about 60 minutes.
*Proofing Test: Poke the dough with a finger, if it retracts, then let it rise for another 10 minutes and repeat the test; if it does not, the dough is ready

5. Move the dough to a surface lightly  dusted with bread flour, sprinkle a little bit of flour on the dough surface as well. Punch the dough to release the air. 
6. Shape the dough into a ball and let it rest for 15 minutes, covering with a damp cloth or a plastic wrap.
7. Flatten the dough to release the air, then divide evenly into 8 pieces @ approx. 65g each. Roll one by one into a ball. 
8. Roll each dough with the palm to make a "rain drop" shape, flatten it to 30cm long with the rolling pin.
9. Start rolling from the wider edge (the side further from you), each dough should look like what is shown in the picture:

10. Second proofing: Place the doughs on the lined baking pan with 3cm (1 inch) space in between. Let them rise for 50 minutes until double in size. Meanwhile, preheat the oven at 170C (340F).
11. Bake at 170C (340F) for 18 to 20 minutes until they turn lightly brown. 
12. Let them cool and enjoy!


2020年11月3日星期二

Vegan Oat Banana Brownie (Gluten-free option available)

It seems that it is not that easy to clear a bunch of bananas before dark spots appear. I then had decided to make this fudgy and moist oat brownie.


Preparation:
- Line a 21cm square pan with parchment paper
- Preheat oven at 350F (180C)


Ingredients:
DRY
- Oat flour (ground oats) 50g
- Cake/Pastry flour 50g [ditched this and replaced with oat flour for gluten free]
- Dark Cocoa powder 1/2 cup
- Baking powder 1t
- Salt 1/2t

WET + sweetener
- ripe banana 2 medium, mashed
- plant-based milk 1T (15mL)
- Vanilla extract 2t (10mL)
- Maple syrup 1/4 cup (60mL)
- Unsalted peanut butter (or any butter you have) 3T
- Monkfruit sweetener (or other sweetener you have) 1/4 cup (free to adjust to your preferred sweetness)

Additional items:
- Hazelnuts 50g, chopped
- Semi-sweet chocolate chips 20-30g (according to your preference, can add more)

How to make:
1. Add all dry ingredients to a large bowl and mix well with a whisk
2. Add all wet ingredients and the sweetener to the flour mixture, blend well with a whisk until no obvious flour and powder can be seen
3. Fold in the chopped hazelnuts
4. Pour the batter into the lined pan, smooth the surface with a spatula, sprinkle the chocolate chips on top 

5. Bake at 350F (180C) for 25-30 minutes or until a fork comes out clean after inserting into the brownie
6. Let it cool down a little bit and serve! Great to pair with a cup of earl grey tea or matcha 🍵 

2020年10月23日星期五

Whole Wheat Potato Torn Bread (Vegan, Eggless, Dairy-free!)

Have got a pack of baby potatoes from Trader Joe's, apart from making Japanese curry, why not using them in baking!

This lovely potato torn bread is soft, fluffy and moist even in a couple of days. Credit given to the potatoes!

The key to success is an integral TRANSLUCENT and STRETCHY dough! Here are the steps of how to check the dough is ready for 1st proofing:

Step 1:
After kneading, cut off a small piece of the dough, hold it with your thumbs, 2nd & 3rd fingers of both hands.

Step 2:
Gently spread the piece with your thumbs and fingers, stretch to see if a translucent membrane can be formed without breaking. If yes, gluten has developed. The dough is ready for 1st proofing.

A translucent membrane. As this recipe calls for whole wheat flour, the translucent membrane is not as thin as that of white flour. 


You can either knead by hand or in a stand mixer, this time I used my Kitchenaid Artisan.

2020年10月16日星期五

全素黑芝麻吐司(無奶無蛋無奶油)


早前購入了CAROL老師的麵包烘焙書籍,因忙著功課都沒有時間鑽研,這星期時間比較充裕,就再度挑戰滿模吐司(希望這趟成功吧)。

烘焙新手的第二本書有一款亞麻籽吐司,但冰箱裡有黑芝麻粉,再不用可能會浪費了,於是按照Carol老師的小叮嚀,以黑芝麻粉代替,結果不負所望😋

這食譜的其中一個特點就是全素!對啊,沒牛奶、沒雞蛋、沒奶油,非常適合素食人士或者對上述食物敏感的人士食用,可見 Carol老師確實好體貼~

純素黑芝麻吐司 - 感謝CAROL 老師的食譜

模具:450g(一斤)吐司模1個

高筋麵粉 250g
全麥麵粉 30g
黑芝麻粉 20g
速發酵母 5-6g(自行多加了,因為家中的酵母和老師的有別,太少發不了)
羅漢果糖 20g(原食譜為細砂糖)
鹽 1/2t
橄欖油 20g
冷水 185mL(原食譜為190g,由於麵粉吸水量有別,自行減少了)

1. 將全部材料放入Kitchenaid mixer的攪拌盆(液體保留30mL稍後加入),以速度1混合均勻成團及無粉粒,大概3分鐘。期間觀察麵團是否太乾,如有需要,慢慢加入剩餘的冷水,每次大概5mL。
2. 成團後,調校至速度2,繼續攪打,大概3分鐘,麵團開始脫離攪拌盆。
3. 麵團離盆後,調校至速度3,持續攪打4-5分鐘,期間如麵團離開了麵團鈎,停下機器將麵團放好,才繼續攪打,直至打出薄膜(即"手套膜")。
知道網上許多烘焙朋友都會用速度4攪打麵包麵團,但試過一次後,機器太熱了。再上網參考一下大家如何用kitchenaid打麵團,加上多次嘗試,得出以上結論。你們也可以試試看或者分享一下經驗😊
4. 麵團打出薄膜後滾圓,收口捏緊。
5. 第一次發酵:取一個透明碗盆,內部塗上薄薄一層油,將麵團收口朝下放入碗盆,並於麵團表面噴灑一點點水,蓋上矽膠蓋(我的是從宜家家居購入的)/保鮮膜/徹底擰乾的濕布,讓麵團在30-35C的環境下發酵至2倍大,需時大概60-70分鐘。
由於美國現在開始轉冷,我跟著CAROL老師的"微波爐發酵",在微波爐內放一杯熱水,讓麵團在合適的溫度之下好好長大,熱水冷了就更換。
6. 在工作枱/揉麵墊上灑上一些高筋麵粉,將發酵好的麵團取出,上面同樣灑上一些高筋麵粉,用手或排氣擀麵棍排出空氣。


7. 第一次鬆弛:分割麵團成二等份,分別滾圓,收口無需捏緊,蓋上擰乾的濕布,讓麵團鬆弛15分鐘。
8. 第二次鬆弛:將兩個麵團以擀麵棍壓成長形(約25-30cm),然後從短邊由上至下的方向捲起,讓麵團再鬆弛15分鐘。
9. 將捲起的麵團轉90度,再以擀麵棍壓成長約35-40cm、寬度與吐司模同寬,然後從短邊由上至下捲起,記緊不要捲得太緊,讓麵團有空間。
10. 第二次發酵:麵團捲好後,並排放入吐司模中央,麵團之間留一點點距離,蓋上擰乾的濕布,在30-35C的環境下(密閉空間如微波爐)發酵至9分滿,需時大概60分鐘。在發酵至8分滿時,預熱烤箱至210C(410F)。
11. 放上吐司模蓋,放入烤箱,烘烤38-40分鐘。
12. 烘烤完成的吐司,立即從烤箱取出,放在網架上放涼,以免吐司因餘溫回縮。


2020年10月14日星期三

純素豆腐巧克力蛋糕(無蛋奶,免烤)

 9月下旬是大少的生日,就想要做一個純素的生日蛋糕給他。剛好冰箱裡有一塊嫩豆腐,又有很多的可可粉,不如就做一個巧克力乳酪蛋糕吧!不用加入太多糖之餘,又能滿足他嗜甜的口味,自己又特別鍾情巧克力(😆 說出重點了)。

二人份的蛋糕,用一個4吋直徑x3吋高的活動蛋糕模就剛剛好。

由於人在美國,就選了一個當地品牌的模具Fat Daddio's。起初還擔心質素問題,畢竟外地很多產品都在某國設廠,想找到非該國出產的廚具、烘焙用具實在不容易。幸好,這款模具沒有令我失望,生產地和模具堅固度也合心意。


純素豆腐巧克力蛋糕(無蛋奶,免烤)

預備工作:
  • 先用焗爐專用紙或鋁箔紙包覆模具底板,以便冷凍後的蛋糕更易脫模
  • 於模具內塗上薄薄一層植物奶油或椰子油,方便脫模
  • 預備一張大小足以包覆模具頂部的鋁箔紙,於冷凍蛋糕時使用

材料:

餅皮:
椰棗乾(去籽)或無花果乾 2-3顆
榛子果仁 25g
杏仁 25g
椰子油 1T
無糖黑可可粉 1T(可省略)

1. 先以食物調理機將椰棗乾或無花果乾略為搗碎,然後加入其他材料,繼續攪打至可以成團(如太乾,可加入1t 冷水幫助提高團狀黏性)。
2. 把攪打完成的餅皮鋪滿模具底部及四周,輕輕按壓,確保餅皮不會跌下,然後放入冷凍庫固定備用。

豆腐及巧克力層:
嫩豆腐(一盒454g)取約300g 
生腰果 35-40g(預先以熱水浸泡30分鐘至軟身)
可可脂 2T
椰子油 2T
香草精 2t
楓糖漿或麥芽糖漿 2-3T(視乎喜愛的甜度)
蘋果醋(有機或普通均可)1/2t
無糖黑可可粉(生熟均可)3T

1. 將材料(除了可可粉)放入食物調理機混合、攪打至均勻及幼滑
2. 取出先前放在冷凍庫的餅皮,將1/3的豆腐可可層倒入餅皮,鋪平;模具下墊一塊毛巾,然後拿起模具輕碰毛巾,幫助消滅氣泡,用原先的鋁箔紙包好,放回冷凍庫30-45分鐘至豆腐巧克力層凝固
3. 將材料內的可可粉加入食物調理機,混合步驟1的豆腐可可層至完全融合成為黑巧克力層。
4. 豆腐巧克力層凝固後,從冷凍庫取出,倒入黑巧克力層,鋪平並如步驟2般輕輕把氣泡敲出,用鋁箔紙包好,放回冷凍庫至少4-6小時或一晚至完全凝固成為蛋糕
5. 凝固後,脫模

裝飾:
黑巧克力 20g,可隨意加減
1T植物奶 

融化黑巧克力,混合植物奶製成巧克力醬,享用前淋上蛋糕,圖案隨意就可以了💖


個人比較喜歡無花果乾的餅皮,味道較香甜

食譜參考了Barrel leaf再修改😊


2020年5月29日星期五

黑白糖不甩 純素 Glutinous Rice Balls with Black and White Sesame Seeds 100% Vegan!

港式甜品五花百門,最經常用到的材料就是不同的粉類,糯米粉、粘米粉、太白粉、澄麵⋯⋯只要有這些食材,很多時候都能製作出美味的甜品。

今次就先用糯米粉及粘米粉製作100%素食的糖不甩,口感煙韌軟糯,存統的製法會加上花生碎和椰絲,不過自己偏愛芝麻,於是就改為加上經烘烤的黑、白兩款芝麻粒,看到櫃裡還有一大包未開封的烤胚芽,就一併添加了。成品少了花生的油膩,多了黑芝麻及胚芽的因烘烤而突出的香氣。

這份食譜的份量已作出調整,適合小家庭作為簡單的甜點。

材料 - 小粉糰:
糯米粉 Glutinous Rice/Sweet Rice Flour 100G
粘米粉/在來米粉 Rice Flour 20G
沸水 Hot Water 40ML
清水 Water 60ML

材料 - 糖水:
紅糖(黃片糖)Brown Sugar Bar 半塊(1/2 piece)
清水 Water 300ML

配料:
黑、白芝麻粒 適量
烤胚芽 適量

1)將糯米粉、粘米粉過篩到碗盆內,以筷子或刮板攪拌均勻
2)先加入沸水,攪拌後以手搓揉數下;加入清水,再加以搓揉至形成粉糰及其表面光滑。如果太乾,可酌量加入清水;如太黏則加入少量糯米粉,直至質感和濕度適中。


3)將粉糰分為兩半,分別把粉糰以手搓成長條形,每條大概可以分成9個小粉糰,合共18個小粉糰。放在撒上糯米粉的工作枱或器皿備用


4)製作糖水:將清水及紅糖放入一鍋內,以中至大火煮滾至紅糖片融化,調校至最小火,放在一旁備用

5)另外煲一鍋水,水滾後,放入小粉糰,煮至浮面或按個人喜好煮至微軟身,撈起放入糖水內,煮5-8分鐘或至軟糯及小粉糰吸收了足夠糖水後,上碟


6)灑上黑、白芝麻粒、胚芽,趁熱享用*

*可選擇灑上花生碎、椰絲、楓糖漿


紫薯吐司(純素。無蛋奶)